Author: mzsvhthi-ca

  • How to Set Up and Get Your OpenAI API Key (No Tech Skills Needed!)

    How to Set Up and Get Your OpenAI API Key (No Tech Skills Needed!)

    If you’ve recently come across apps or tools that ask for an OpenAI API key, you might be wondering: What is it? Why do I need it? How do I get one? Don’t worry — you’re not alone, and the process is actually very simple.

    This guide is written for non-technical users, so whether you’re a content creator, entrepreneur, or just someone curious about AI tools like ChatGPT or DALL·E, we’ve got you covered.


    💡 What is an OpenAI API Key (and Why You Might Need One)?

    An API key is like a digital key that unlocks access to powerful tools developed by OpenAI — such as ChatGPT (for writing and conversations), DALL·E (for image generation), or Whisper (for audio transcription).

    Many apps or services that use OpenAI’s technology will ask you to provide your own key. Why? Because it gives you more control over your usage and billing, and it ensures your data is handled more securely and privately.


    🎯 Who Is This For?

    This quick tutorial is perfect for:

    • Bloggers, writers, and content creators using AI-powered assistants
    • Small business owners exploring automation tools
    • Students or researchers using ChatGPT or Whisper
    • Anyone testing AI-powered software that requires a key from OpenAI

    No coding or tech background required!


    🛠 Step-by-Step Guide: How to Get Your OpenAI API Key

    1. Create an OpenAI Account

    Go to https://platform.openai.com/signup and sign up for an account.
    You can register using your email, Google, or Microsoft account.

    💬 Tip: You may be asked to verify your email and phone number for security purposes.

    How to get an OpenAI API key

    2. Log in to the OpenAI Platform

    Once your account is set up, log in at:
    👉 https://platform.openai.com

    This is your personal dashboard where you can manage your keys, billing info, and explore AI tools.


    3. Find the API Keys Section

    To locate your key:

    • Click on your name or profile icon (top right corner)
    • Choose “View API Keys” from the dropdown

    Or just go to this direct link:
    👉 https://platform.openai.com/account/api-keys

    How to get an OpenAI API key

    4. Create Your API Key

    • Click “+ Create new secret key”
    • Name your key something like “My Main Key”
    • Click Create, and you’ll see a long string of characters — this is your secret API key

    ⚠️ Important: Copy and save the key immediately. You will not be able to view it again later.

    That’s it! You now have your own OpenAI API key that you can use with compatible tools and services.

    How to get an OpenAI API key

    💰 Is OpenAI Free to Use?

    Yes! OpenAI offers a free trial credit when you first create your account. This allows you to test their tools without adding a credit card right away.

    Once your free credits run out, you can continue using the services by adding a payment method. You’ll only be charged based on how much you use.

    To check your balance or billing status, go to:
    👉 https://platform.openai.com/account/billing


    🔒 How to Keep Your API Key Safe

    Here are a few quick but important safety tips:

    • Never share your API key in public or on websites you don’t trust.
    • Don’t post it on forums, social media, or in screenshots.
    • If you think someone else has your key, you can delete it and create a new one instantly.
    • Only use it in tools and apps you trust, especially if you’re entering it manually.

    ❓ Why Do Some Apps Ask for My API Key?

    Some third-party apps that use OpenAI give you the option to bring your own API key instead of using their limited access.

    This can be a good thing because:

    • You get full control over your usage
    • You may be able to use newer models (like GPT-4)
    • You know exactly how much you’re spending, and on what

    It’s a common way to integrate AI tools into your daily workflow safely and efficiently.


    🧠 What You Can Do With Your OpenAI API Key

    Once you have your key, the possibilities are endless! Here are a few things you can do:

    • Use ChatGPT to help write emails, blog posts, or social media captions
    • Generate stunning AI images using DALL·E
    • Transcribe and summarize meeting recordings with Whisper
    • Connect your API key to a desktop or mobile app that boosts your productivity

    No matter your goal — writing faster, brainstorming ideas, or saving time — your OpenAI API key gives you access to the tools you need.


    🚀 Ready to Get Started?

    Now that you have your OpenAI API key, you’re all set to explore a new world of smart tools and automation.

    👉 If you’re looking for easy-to-use productivity apps powered by AI, be sure to explore our tools at Smalltechsolutions.cloudaccess.host — we build apps designed for creators, freelancers, and non-tech users who want to work smarter.


    📌 Summary (TL;DR)

    • Sign up at platform.openai.com
    • Go to Account > API Keys
    • Click “Create new secret key”
    • Copy and save it — that’s your access to OpenAI’s tools
    • Use it in trusted apps or platforms that support OpenAI
  • Introducing Briefly – Your Free AI-Powered Audio & Video Summarizer

    Introducing Briefly – Your Free AI-Powered Audio & Video Summarizer

    Briefly is perfect for anyone who wants to stop wasting time and start working smarter. Not only is it fast, private, and simple to use — but most importantly, it actually works.

    As a result, you get the summary and skip the noise. Instead of sitting through hours of content, try Briefly and take back your time. With the help of AI, it turns audio and video files into clear, actionable takeaways — in just a few clicks.

    And the best part? It’s completely free.

    AI to summarize audio and video files

    💡 What Is Briefly? A Free AI Audio and Video Summarizer App

    Briefly is a simple desktop app that lets you upload an audio or video file and, within seconds, generates an AI-powered summary. Instead of spending hours rewatching recordings, you can quickly get the key points and move on with your day.

    It’s powered by the latest OpenAI language models and designed to run locally on your machine. All you need to do is paste your own API key — after that, Briefly takes care of the rest. This ensures a private, secure, and streamlined experience. OpenAI API key here.


    Why Use an AI-Powered Audio and Video Summarizer Like Briefly?

    We live in an age of information overload. Online courses, Zoom meetings, webinars, interviews, and podcasts are everywhere. As a result, it’s easy to feel overwhelmed — and difficult to keep up.

    This is where Briefly shines.

    For example:

    You record a 1-hour meeting. Upload it to Briefly. In less than a minute, you have a bulleted summary with main decisions and action items.

    You download a podcast or YouTube video. Drop it into Briefly. Out comes a quick, skimmable summary.

    You’re preparing for exams and have hours of recorded lectures. Instead of reviewing them all, Briefly turns them into easy-to-read notes.

    In every case, you save time and gain clarity — instantly.


    Top Features of Briefly – Your AI Audio & Video Summary Tool

    🔊 Audio & Video Support
    Upload MP3s, MP4s, and other common formats. No matter the file, Briefly handles both audio and video with ease.

    🧠 AI-Generated Summaries
    Powered by state-of-the-art OpenAI language models, Briefly delivers clean, natural-sounding summaries that are actually useful.

    🔐 Privacy First
    Everything runs locally on your device. You use your own API key. Therefore, your files remain private.
    👉 Track your API usage here

    🖥️ Cross-Platform Desktop App
    Works on Windows, macOS, and Linux. No browser tabs, no extra clutter — just drag, drop, and summarize.

    💸 Completely Free
    Unlike many tools, there are no subscriptions, no upsells, and no data harvesting. It’s free software, made for people who value their time.


    🎯 Who Should Use Briefly?

    The app is designed for busy people who want to work smarter. If you’ve ever thought, “I just need the key takeaways,” this app is for you.

    Students: Summarize lectures and study smarter

    Remote teams: Review meetings without watching them again

    Researchers: Extract insights from long interviews

    Journalists: Pull quotes from recorded conversations

    Content creators: Revisit your own videos more efficiently

    Lifelong learners: Stay on top of podcasts and online courses

    In short, our app isn’t just a productivity tool — it’s a clarity tool.


    🔧 How It Works

    Getting started is incredibly simple:

    1. Download the Briefly desktop app
    2. Select your audio or video file
    3. Paste your OpenAI API key (one-time setup)
    4. Click “Summarize”
    5. Get a clean, AI-generated summary

    That’s it. No signup. No learning curve. No distractions.


    Private & Secure: AI Summarizer with BYO API Key

    Many AI tools rely on cloud services and store your data. On the other hand, Briefly is local-first.

    Because you use your own OpenAI API key, everything runs on your machine. Your files stay private. There’s no account, no cloud syncing, and no shady background processes.

    As a result, you get total control — and peace of mind.


    📅 When Is It Launching?

    We’re polishing the final version to make sure it’s fast, stable, and user-friendly. In the meantime, you can sign up to be the first to know when it drops.


    👋 In Summary…

    Briefly is for anyone who’s ready to stop wasting time and start working smarter. It’s fast, private, easy to use — and most importantly, it gets results.

    In other words, it helps you focus on what matters.
    So instead of watching hours of content, let AI give you the insights you need.

    Try Briefly today and take back your time.

    Check out our Post about Table of Contents block

  • Free Table Of Contents Plugin for WordPress: A Must-Have Tool for Bloggers and Small Business Owners Using Gutenberg

    Free Table Of Contents Plugin for WordPress: A Must-Have Tool for Bloggers and Small Business Owners Using Gutenberg

    Improve Your Blog’s Readability, SEO, and User Experience with a Simple, Free WordPress Tool

    If you manage a blog or run a small business website using WordPress, you’re probably always looking for ways to improve the way your content is presented. Long-form blog posts, detailed tutorials, and informational pages can be incredibly valuable — but they can also be overwhelming to read if not properly structured.

    That’s where a Table of Contents (TOC) can make a huge difference.

    Adding a TOC helps your readers quickly scan your content, find the information they need, and stay engaged longer. It also helps improve your website’s SEO by giving search engines a better idea of how your content is structured.

    Best of all? You don’t need a complex plugin or a bloated theme to do it.


    ✅ Meet the Free TOC Block Plugin for Gutenberg

    We developed the TOC Block Plugin for WordPress to be exactly what many creators need:
    A lightweight, easy-to-use, and completely free way to add a table of contents to your blog posts or pages using the native Gutenberg block editor.

    No need for third-party builders. No confusing settings. Just install, drop in the block, and go.


    🔍 Why Use a TOC Plugin on Your WordPress Site?

    Adding a Table of Contents to your content isn’t just a nice touch — it’s a best practice for both usability and search engine optimization.

    Here’s why:

    • Better User Experience: Visitors can instantly see the structure of your article and jump to the section they care about.
    • Increased Engagement: Readers are more likely to stay on the page longer when they can easily navigate through your content.
    • Improved SEO: Google loves well-structured content. Using a TOC can enhance your page’s rich snippets, especially for how-to guides or FAQ-style posts.
    • Accessibility Friendly: A TOC makes your site more usable for people relying on screen readers or keyboard navigation.

    Features of the TOC Block Plugin

    This plugin is built with simplicity and performance in mind. Here’s what makes it great:

    • 🧱 Native Gutenberg Block: Add the TOC anywhere in your post using the block editor — no shortcodes required.
    • 🎯 Customizable Heading Levels: Choose whether to include H2, H3, H4, etc.
    • 💨 No Extra Bloat: Doesn’t load unnecessary JavaScript or CSS files.
    • 🎨 Minimalist Design: Easily fits into your theme’s style or can be customized with your own CSS.
    • 🌐 Works With Any Theme: No special integration or configuration needed.

    Who Should Use This Plugin?

    This plugin is perfect for:

    • Bloggers who publish long-form content, how-to guides, or tutorials
    • Small business owners who use their websites to share knowledge or showcase services
    • Freelance WordPress developers building websites for content creators or coaches
    • Non-tech-savvy users looking for a TOC that just works without technical setup

    Download the Free TOC Plugin

    You can download the plugin directly from our site or install it via the WordPress plugin directory.

    👉 Download TOC Block Plugin Now

    Final Thoughts

    Your website visitors are busy. Help them stay engaged and find the info they need by structuring your content with a simple Table of Contents.

    Our free TOC Block Plugin is the easiest way to do that in WordPress — no learning curve, no bloat, and no hidden upsells.

    Give it a try today and instantly improve your blog’s readability, navigation, and user experience.

    Check also our blog about time organization here

  • How to Stay on Top of Timesheets Without Losing Your Mind

    How to Stay on Top of Timesheets Without Losing Your Mind

    If you’ve ever ended a long day only to realize you forgot to log your hours, you’re not alone. Timesheet organization shouldn’t be a headache — but for freelancers, remote workers, and small teams, it often is. The good news? It doesn’t have to be.

    In this post, we’ll walk through a few practical tips to keep your timesheets organized — and show how TimeSnap can make it easier without adding extra noise to your workflow.

    1. Keep It Simple

    The biggest mistake people make with timesheets is overcomplicating them. Don’t try to track every little detail down to the second — unless you’re billing hourly for every microtask, it’s not worth the mental overhead.

    Instead: Stick to meaningful time blocks. Whether that’s by project, client, or task type, consistency is more important than precision.

    timesheet organization

    2. Choose the Right Format for You

    Are you a spreadsheet person? A bullet journal fan? Or maybe you prefer digital tools?

    For example, if you’re using apps like TimeSnap, you can simply snap moments throughout your day when you switch tasks, attend meetings, or start coding. These time “snaps” act like digital breadcrumbs — helping you remember what you did without relying on memory at the end of the day.


    3. Automate What You Can

    Manual entry is where most people lose interest. So automate as much as possible:

    • Calendar integration
    • Auto-categorization of activities
    • One-click summaries

    That’s exactly why I built TimeSnap — to turn audio, screenshots, and task switches into a smart, searchable timeline. No more guessing what you did between 11:00 and 2:30.


    4. Review Weekly, Not Just Monthly

    If you only check your timesheets once a month, you’re probably missing patterns (or mistakes). Try doing a 5-minute weekly review — it’s quick and helps you:

    • Catch gaps
    • See where time was wasted
    • Improve how you plan next week

    With TimeSnap, you get a visual timeline and summary that makes weekly reviews surprisingly easy (and kind of satisfying).


    Final Thoughts

    Timesheet organization doesn’t have to be another task on your to-do list. With the right habits — and a tool like TimeSnap — it can become second nature. Whether you’re tracking hours for clients or just keeping tabs on how your time is spent, staying organized gives you back control over your day.


    Want to try TimeSnap for yourself?
    👉 Download the free version here

    Let us know how you manage your time — I’d love to hear what works for you!

    Check this Blog on how to use TimeSnap

  • TimeSnap: The Free Timesheet Generator for Employees & Freelancers

    TimeSnap: The Free Timesheet Generator for Employees & Freelancers

    Tired of Complicated Time Tracking Tools? Meet TimeSnap

    If you’ve ever tried to track your working hours with spreadsheets or overly complex apps, you know how frustrating it can be. That’s why we built TimeSnap, a free timesheet generator for employees and freelancers who just want to keep things simple.

    Whether you’re working remotely, freelancing for multiple clients, or just need a quick way to create a timesheet for payroll, TimeSnap makes it easy—without the learning curve.

    What is TimeSnap?

    TimeSnap is a lightweight desktop app (for macOS) that helps you:

    ✅ Load your CSV timesheet (exported from tools like Google Sheets or Excel)
    ✅ Drag and drop files or use a file picker
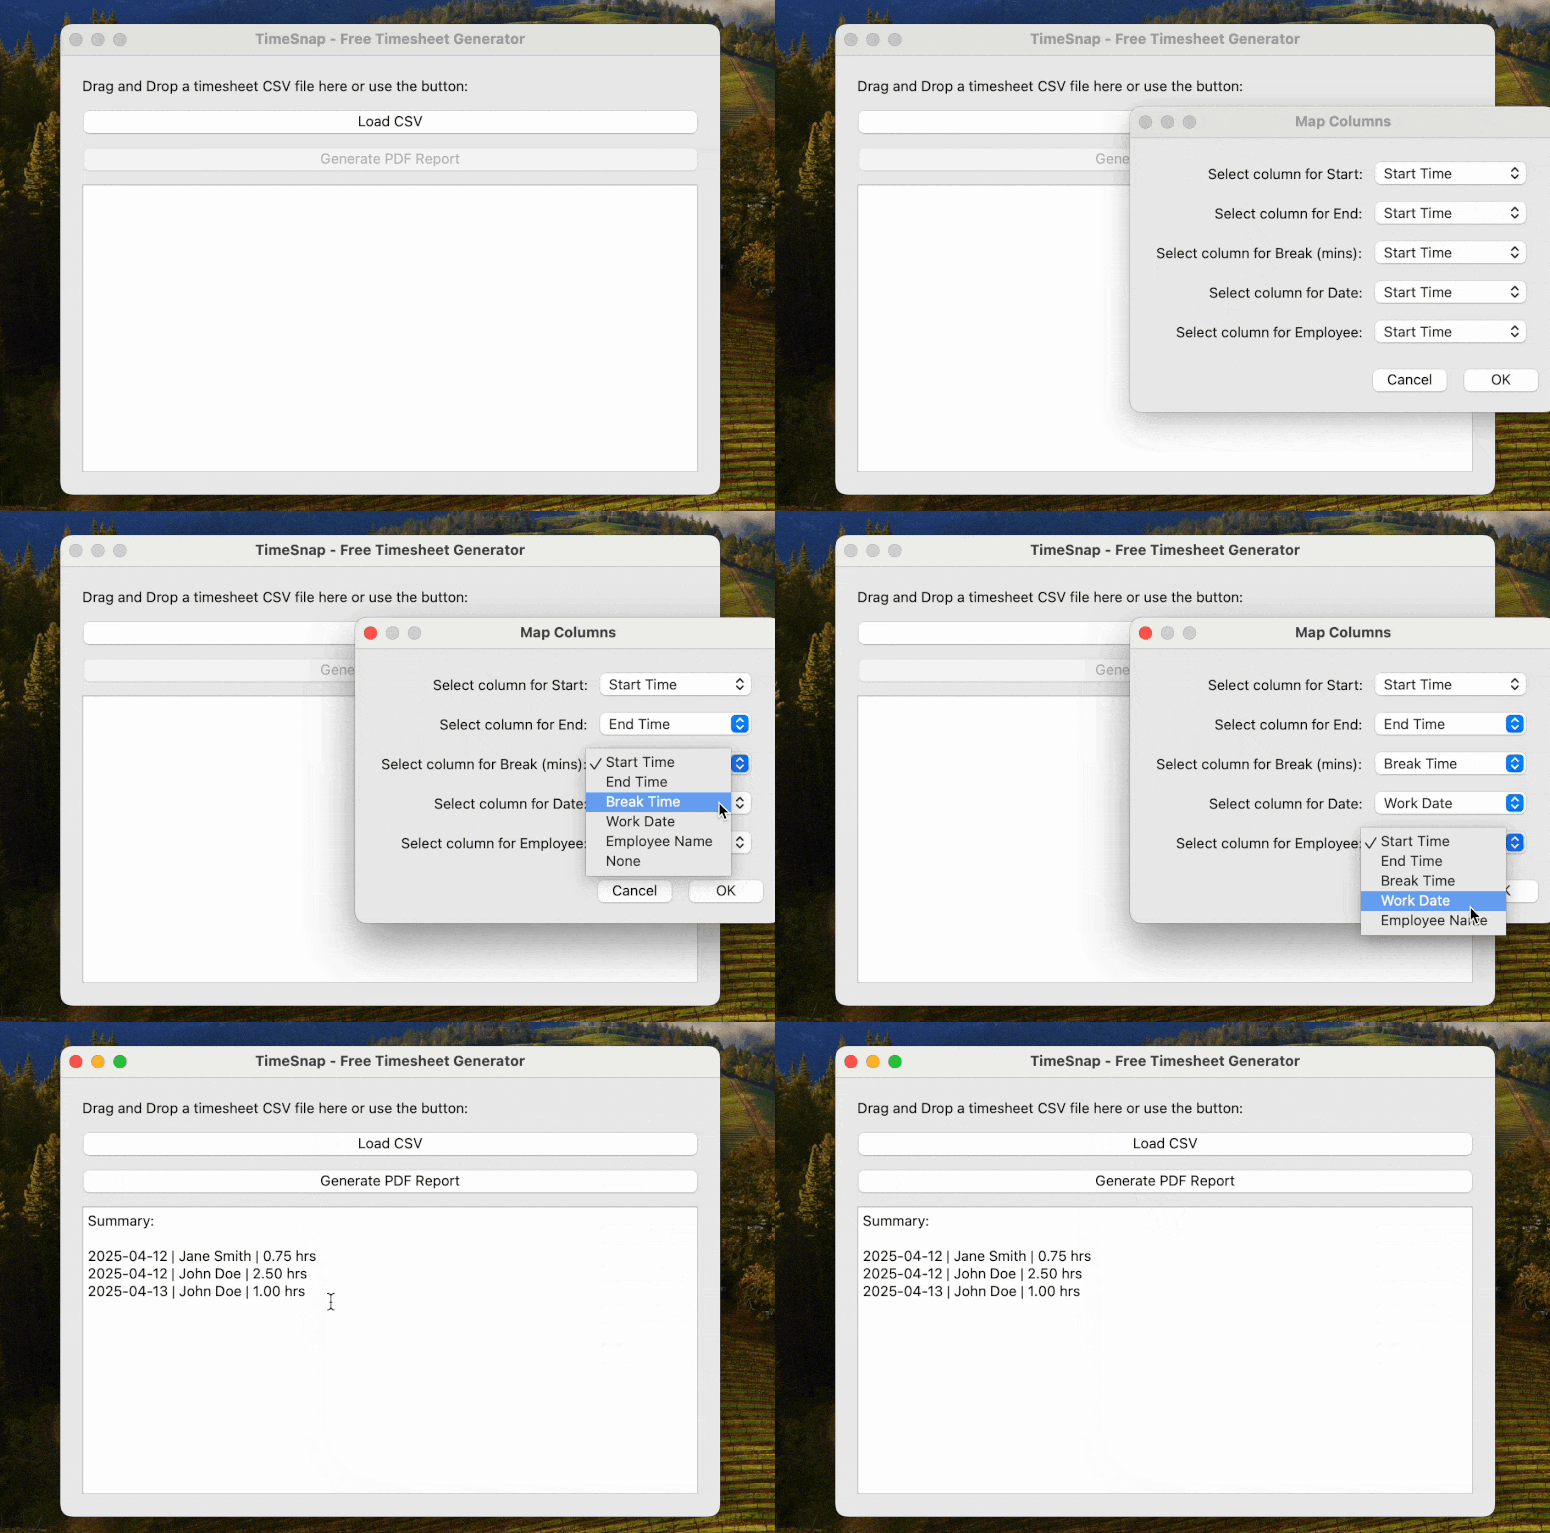
    ✅ Map your Start, End, Date, Employee, and optional Break columns
    ✅ Generate a clean PDF timesheet summary in one click
    ✅ Keep your data private (nothing is uploaded or stored)

    And best of all? It’s 100% free.

    Who Is TimeSnap For?

    TimeSnap was designed for: freelancers who need to send clean, professional time reports to clients, employees who track their hours manually or with CSV exports, small teams without budget for expensive SaaS platforms or anyone who wants a quick and private way to generate timesheets

    No Sign-Up, No Cloud, No Fuss

    Unlike web-based tools like Toggl or Clockify, TimeSnap runs offline on your desktop. Your files stay on your computer—no need to sign up or create an account.

    Generate Your Timesheet in Seconds

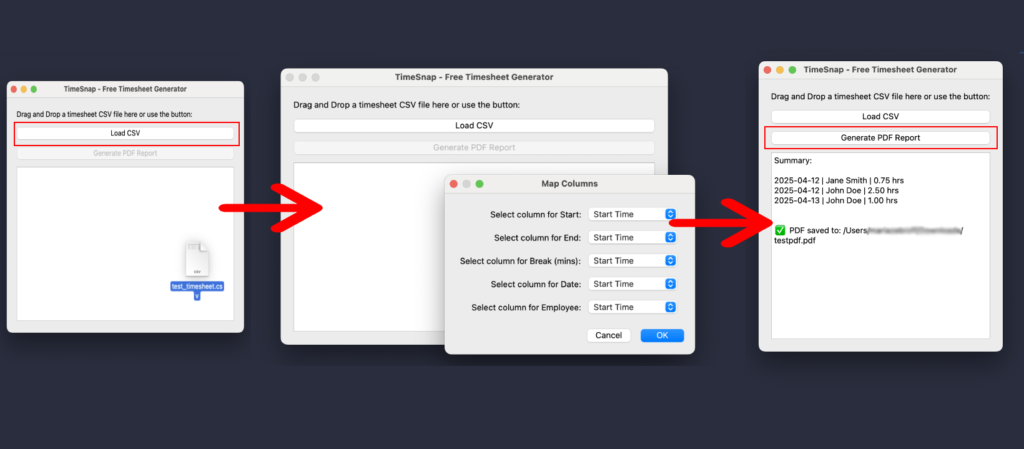
    Here’s how simple it is:

    1. Open the app
    2. Drag and drop your CSV
    3. Map your columns (once)
    4. Click “Generate PDF”
    5. Done ✅
    Free Timesheet Generator for Employees & Freelancers: Open the app. Drag and drop your CSV. Map your columns (once). Click “Generate PDF”

    TimeSnap even adds a watermark to show it’s the free version, so clients know you’re using an official tool.

    Try TimeSnap Today — It’s Free!

    👉 Download TimeSnap Free for macOS

    💬 What’s Next?

    We’re working on a Pro version with:

    • Custom branding for PDFs
    • Editable break rules
    • Multiple file exports
    • And more…

    But for now, enjoy the free version and let us know what you think!